-
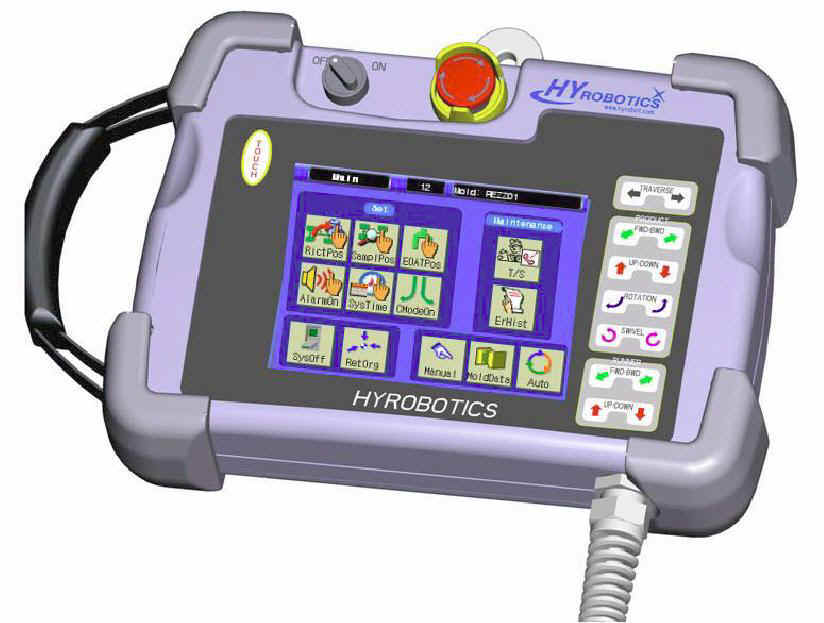
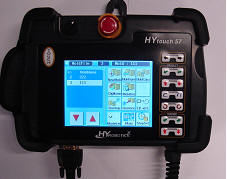
HYNC-700 Provide
easy and simplified motion control for sophisticated
injection molding Robot Automation using color touch
screen , servo Jog button, and play back step by
step motion control. New concept Robot control
technology will allow easy plant automation and
minimize your set up time and thus maximize your
profit. NEXIA, HYBRID Series
robot will be used with this controller.
ü
Powerful hand held control pendant with full color touch
screen.
Basic Features
-
Developed specially for the molding industry by
automation engineer with years of experience in the
filed.
-
Programming required no special skill or knowledge with
4 Basic Take out Step.
-
Expandable up to 80 Step with Add position & Motion,
User output and User input.
-
Mold
Program can be saved up to 99 with 80 Step Program.
-
Mold take our Routine are made by teaching the robot via
easy menu driven programming.
-
Complex task like parts stacking, palletized insert
loading and post process operation are easily
accomplished by entering the basic data for the task.
-
Input, output and logic circuits allow easy integration
with other equipment.
-
Languages:
English, Spanish and Korean
-
Input /
output signal display with LED style icon in Touch
Screen for easy maintenance. ( In Auto, Manual, Step
Screen )
-
Minimal floor space required, stand for control pendant
may be replaced with beam mounted switches and hanger.
-
Conveyor or secondary equipment start signal.
-
Defective product rejecting circuit.
|
Main
Screen |
Manual
Screen |
Automatic Screen |
 |
 |
 |
|
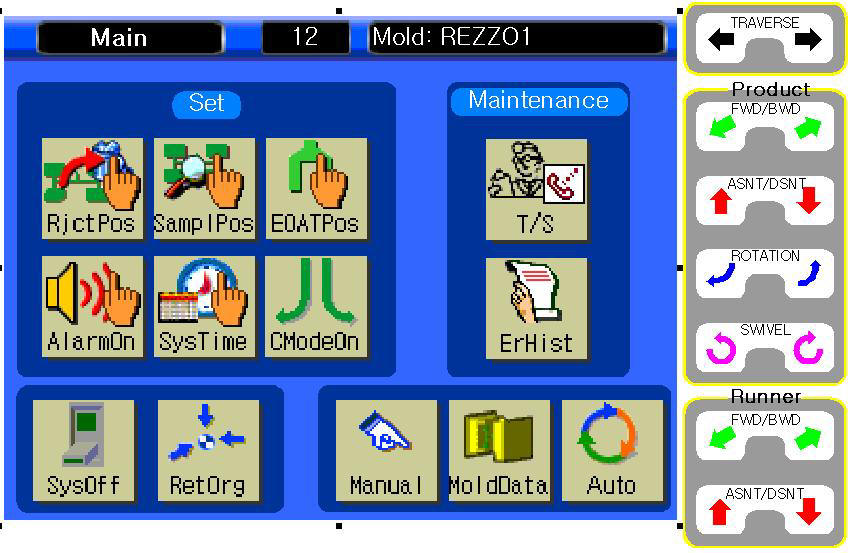
Main Screen
-
Simple Main Screen allow operator easy to
navigate all screen to access.
-
Right top corner displays current open mold
file.
-
Login Access function to allow qualified
person allow to change mold file setting.
-
Simple one Homing screen for clearing all
the mixed signal to clear with machine
interface and user output.
-
J
motion selection on / off for certain mold
file.
-
System turn off key to make sure to follow
up procedure of step.
|
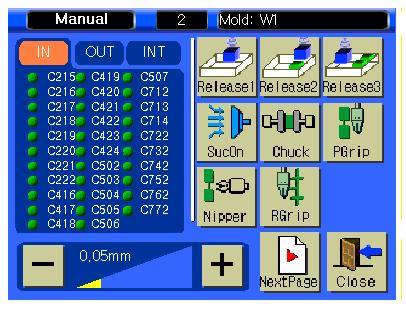
Manual Screen.
-
Manual Operation with built in Safety with
machine interface
-
Adjustable speed controls
in manual mode.
-
Actual
Position displays in screen.
-
Vacuum or Gripper circuit Valve
operation.
-
User
Output Operation to generate 24 Volt DC.
-
Soft
Membrane button switch out side of touch
screen for operation of each servo axis and
chuck rotation.
-
Input /
output / Machine Interface signal display with LED style icon in Touch
Screen for easy maintenance.
-
When robot arm goes in to molding area in manual
mode, Robot doesn't allow mold close for built in
safety.
|
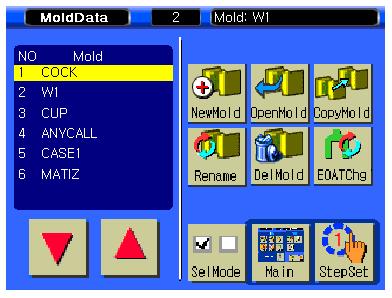
Mold File Screen.
-
Creating new mold with one touch button.
-
Open
exisiting saved mold to recalll mold file.
-
Copy
exisiting mold file with different name with
pattern of motion ( without position ) or
all data including position.
-
Rename mold file with different name.
-
Delete mold file when mold project is not
available.
-
Back
up file inside of robot controller
-
Restore file from inside of robot controller
which backed up in the past.
-
Back
up to Laptor ( USB stick ) with RS-232
connection.
-
Saved or selected Mold selection allow robot
control variout function depends on each
mold
-
Step
set allow check mold file is right position
for each step.
|
| |
|
|
|
Step Set
Screen |
Automatic Screen
|
Palletizing Screen |
 |
 |
 |
|
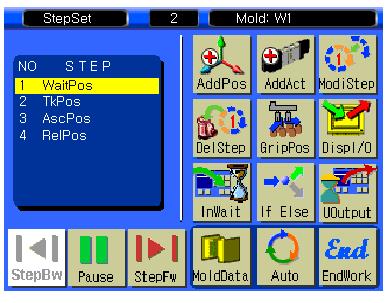
Step Set
Screen
-
Programmable for any molding automation with easy
step add function with 4 Basic Safety Position
-
Basic parts take out step is only 4 line. (
4 Step )
-
Add
Position and Motion can be added up to 80 steps to
easy to set up gate cutting or others.
-
Simultaneous and coordinated motion control for each
Axis can be selected.
-
Add User
Output to communicate with 2ndary automation, Wait
User input to receive signal from 2ndary automation
for Insert Molding, IML automation.
-
Servo Jog
Button for 1 Step motion to make sure position is
accurate.
-
Touch Jog
button or 1 Step
Forward or 1 Cycle Slow.
-
Special Designed Insert Picking Step for
Insert Molding Application.
|
Automatic Screen
-
Start and Stop for Auto Production with
automatic interface with Molding machine
-
Dry
1 cycle to allow only machine to run in 1
Cycle without machine operation yet still
checking interface safety.
-
Auto
Button will start with molding machine
automatically.
-
Reset
Total Production Counter, Goal and Current will
blink on robot beam.
-
1 Cycle
Fast Operation, Pause and Restart in Auto.
-
Adjustable speed controls in auto ( while robot is
in operation ).
-
Adjustable
Position controls in auto ( while robot is
in operation ).
-
Rejected
Signal will separate parts to desired position. (
Either from molding machine or 2ndary automation )
-
Palletizing screen to check current status
stacking.
|
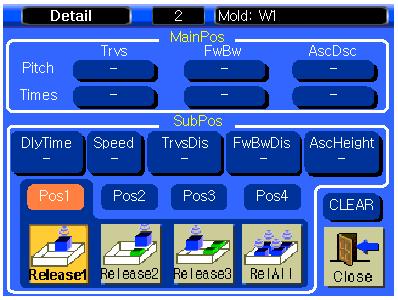
Palletizing Screen
-
In
Release step, built in palletizing screen
allow operator to use stacking.
-
From
release position, up to 99 different
position for each axis with distance.
-
Built is safety of stroke to program check
palletizing safety not allow robot to be out
of range of operation.
-
Main
Position is for different position stacking
for each cycle.
-
Sub
Position is for multi cavity release positon
for 1 cycle ( Specially designed for
automotive industry for 2 cavity separation
)
-
Operator's simple input allow realize
complete stacking function.
-
Built in stacking signal allow communicate
2ndary automation like conveyor or stacking
machine.
|
| |
|
|
|
PC
Connection wtih RS-232
|
Free
Software for PC Connect |
|
|
 |
 |
|
|
Mold
File Management screen has TP->PC ( Upload Mold
file to Laptop )
-
Connect Laptop with RS-232 with USB Cable .
( Connect power to Laptop : 110 Volts Power
to laptop required )
-
Turn
on Power and Open File Manager program (
HYRobotics )
-
Select Port which connected USB ( Example :
COM3. COM 4 , COM 5 ).
-
Windows 7. Auto detect , Windows XP might
require special driver to convert USB to
RS-232
-
Once
connected successfully , Select Mold file
with Up/Down Arrow cursor , Press TP->PC to
Upload file to Laptop.
-
Once
upload successfully, automatically save
screen will pop up in laptop to select store
location.
Select
Store location and Save mold file for future
use. |
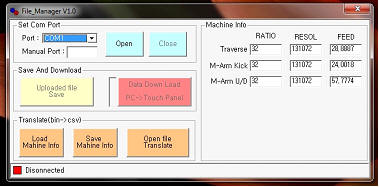
PC
Connect Software ( Free to Down load )
-
Connect Laptop with RS-232 with USB Cable .
( Connect power to Laptop : Power required )
-
Turn
on Power and Open File Manager program (
HYRobotics )
-
Select Port which connected USB ( Example :
COM3. COM 4 ).
-
Windows 7. Auto detect , Windows XP might
require special driver to convert USB to
RS-232
-
Once
connected , Touch : Red Icon : Data Down
Load ( PC->Touch Panel )
-
It
will open screen to select file. ( It will
require same Robot with same robot
controller version for safety. , Mold can’t
be modified from laptop.
Once
download successfully, automatically mold file
will be added in next line with name with
different number.
|
|
| |
|
|
|
|
|
|
|